
Experiencing heavy levels of banner-envy is never pretty. I had shared a booth at a street fair and my booth buddy had a fabu banner.
I wanted one too. Not wanting to wait for a "real" banner to be printed for me, I headed out to the Avery store for some foamcore to make me a banner.
- or at least a booth sign. On the way, I thought to find out if they had any vinyl that I could stitch up and paint on. "No." said Friendly Avery Person, "but you could try over there." "Yeah, but it will cost you a lot

for us to do it." says Friendly Sign Guy, "Go over there. They have everything you'll want." Friendly Sign Guy was right! The Pacific Coast Sign Supply had me shivering with anticipation. If you're an art supply store and/or hardware store junkie, this place would make your knees weak too. I was able not only able to get vinyl there, but a perfect 3' x 4' finished banner with the

grommets and all for the more-than-reasonable price of $8.50. The next issue was painting on it. The PCSS person insisted that I needed to prime the thing and use these (very expensive) special paints and then seal it. Yadda yadda. I asked about just using acrylic paints and was told they wouldn't stick.
Backing out of the store, I said I'd come back later for paints and took

my banner home to try my acrylics. Maybe he just assumed the thing was going to hang outside in the elements or something, but, uh, acrylics
totally work. That said, if I do another one, I think paint pens or somesuch would be a cleaner, faster method.
Here's how I made my new banner:
1) The rolled up banner. You can see the spot where I tested the acrylic. I let it dry and tried scratching it with my nail and erasing it and it wouldn't budge. I'm working on my dining room table as it is the only large clear space in the house...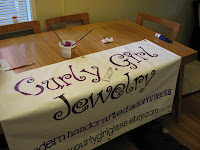 2) The paper there is a print out of a computer design/mock-up. On the mock-up I overlayed a grid and then measured out and drew the grid on the banner. It helped me judge how to space the letters. I then sketched in the letters. As you (maybe) can see, I drew them out pretty roughly, not paint-in-the-numbers quality. It depends on how comfortable you are free-handing it as to how tight your drawing should be.
 3) After I finished the basic drawing. I've pulled out my paints and brushes and picked the colors I would use. 4) Since acrylics dry so fast, I decided to start from the bottom because the smaller lettering is more difficult and I could roll it down in front of me as I worked.5) Here I've just finished the basic lettering. I later added some highlights, in silver paint, to the Curly Girl Jewelry letters; added some decorations; and painted the border using the stitching as my "line".
6) My new finished banner!
 Brand new! These lovely and simply elegant posted earrings are wishbone shaped. When I was a kid, it was considered a privilege at the dinner table to be picked to break the wishbone and make a wish. (no, there weren't like 10 of us, only 3, but I was the littlest) Here is my modern interpretation of my pre-vegetarian-days talisman.
  Sterling and shiny, the Make A Wish Earrings are available in my Etsy shop.


